By Christophe [Groove] Riccio - www.g-truc.net
And
Jerome [JeGX] Guinot - jegx[NO-SPAM-THANKS]@ozone3d.net
Initial draft: May 1, 2006
Last Update: January 7, 2007
2 - Practice
For each sub-part of the practice part, there is an associated class in the samples program of this document. Two other examples none described by this document show the use of VBOs with GLSL and Cg. The single goal of this class implementation is to make theses different method interchangeable.

2.1. VBO basic use as Vertex Array method (class CTest1)
To ease the understanding, let's start with an example that perfectly matches the vertex arrays features. VBOs have a similar API of texture objects for their management.
GLvoid glGenBuffers(GLsizei n, GLuint* buffers);
GLvoid glDeleteBuffers(GLsizei n, const GLuint* buffers);
buffers is an array created by the user in which the VBOs identifiers are store. n objects are created or deleted so take care of the buffers size.
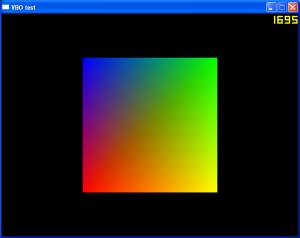
Let's assume that we want to display a quad on screen using two triangles. Our sources could be for example:
static const GLsizeiptr PositionSize = 6 * 2 * sizeof(GLfloat);
static const GLfloat PositionData[] =
{
 -1.0f,-1.0f,
  1.0f,-1.0f,
  1.0f, 1.0f,
  1.0f, 1.0f,
 -1.0f, 1.0f,
 -1.0f,-1.0f,
};

static const GLsizeiptr ColorSize = 6 * 3 * sizeof(GLubyte);
static const GLubyte ColorData[] =
{
 255,   0,   0,
 255, 255,   0,
   0, 255,   0,
   0, 255,   0,
   0,   0, 255,
 255,   0,   0
};
We are using two VBOs to render this six vertices described by the previous array. Arrays are identified by POSITION_OBJECT and COLOR_OBJECT. Creation and destruction of VBOs are performed by the glGenBuffers and glDeleteBuffers functions. The function glBindBuffer allows selecting the active VBO.
static const int BufferSize = 2;
static GLuint BufferName[BufferSize];

static const GLsizei VertexCount = 6;

enum
{
   POSITION_OBJECT = 0,
   COLOR_OBJECT = 1
};
The C++ code to render this quad is:
glBindBuffer(GL_ARRAY_BUFFER, BufferName[COLOR_OBJECT]);
glBufferData(GL_ARRAY_BUFFER, ColorSize, ColorData, GL_STREAM_DRAW);
glColorPointer(3, GL_UNSIGNED_BYTE, 0, 0);

glBindBuffer(GL_ARRAY_BUFFER, BufferName[POSITION_OBJECT]);
glBufferData(GL_ARRAY_BUFFER, PositionSize, PositionData, GL_STREAM_DRAW);
glVertexPointer(2, GL_FLOAT, 0, 0);

glEnableClientState(GL_VERTEX_ARRAY);
glEnableClientState(GL_COLOR_ARRAY);

glDrawArrays(GL_TRIANGLES, 0, VertexCount);

glDisableClientState(GL_COLOR_ARRAY);
glDisableClientState(GL_VERTEX_ARRAY);
glBufferData initialises data storage of VBOs. The last parameter specifies the VBO usage as it is detailed in section 1.2 and section 1.3. The list of all usages is available in section 3.1. Functions such as glColorPointer and glVertexPointer allow specifying the location where OpenGL will respectively find colours and spatial coordinates of the vertices.
The order of these three types of function is particularly important. It is intuitive that we must first select the active VBO for its setup. However, the order of glBufferData and gl*Pointer is important as well. Actually, gl*Pointer refers to the data sources of the active VBO, this source being described by glBufferData.
Remarks:
glBindBuffer(GL_ARRAY_BUFFER, BufferName[POSITION_OBJECT]);
glBufferData(GL_ARRAY_BUFFER, PositionSize, PositionData, GL_STREAM_DRAW);
...
glBindBuffer(GL_ARRAY_BUFFER, BufferName[POSITION_OBJECT]);
glVertexPointer(3, GL_FLOAT, 0, 0);
The rendering is performed by one of the functions dedicated to array rendering: glDrawArrays or glMultiDrawArrays.
In the specific case where the whole memory size of the graphic card is lower than the size we are asking to reserve for a single VBO, a GL_OUT_OF_MEMORY error is thrown and could be found with the common glGetError function.
2.2. Indexed arrays (class CTest2)
During the first example we have used the target GL_ARRAY_BUFFER. It is used for all types of data excepted index arrays witch have their dedicated target, GL_ELEMENT_ARRAY_BUFFER.
Index array initialisation is done by the following code:
glBindBuffer(GL_ELEMENT_ARRAY_BUFFER, BufferName[INDEX_OBJECT]);
glBufferData(GL_ELEMENT_ARRAY_BUFFER, IndexSize, IndexData, GL_STREAM_DRAW);
It’s the part of VBO API that differs the most from vertex arrays. Essentially, it is useless to call glIndexPointer or to activate GL_INDEX_ARRAY state. If the per element rendering function is used with the null value, instead of a pointer to an index array, then the active VBO with the target GL_ELEMENT_ARRAY_BUFFER is used as an indexes source.
The rendering is performed with one of the function dedicated to index arrays: glDrawElements, glDrawRangeElements or glMultiDrawElements.
2.3. Interleaved arrays alternative (class CTest3)
Update of the function glInterleavedArrays [3.4.2] has never been made since it has been included in OpenGL 1.1. This function has often been used for interleaved arrays but even if we still could use it with VBOs, there is a better option based on gl*Pointer functions. The principle is to specify for each attribute of the interleaved array the source of the data using the stride parameter.
#pragma pack(push, 1)
struct SVertex
{
   GLubyte r;
   GLubyte g;
   GLubyte b;
   GLfloat x;
   GLfloat y;
};
#pragma pack(pop)

glBindBuffer(GL_ARRAY_BUFFER, BufferName);
glBufferData(GL_ARRAY_BUFFER, VertexSize, VertexData, GL_STREAM_DRAW);

glColorPointer(3, GL_UNSIGNED_BYTE, sizeof(SVertex), BUFFER_OFFSET(ColorOffset));
glVertexPointer(2, GL_FLOAT, sizeof(SVertex), BUFFER_OFFSET(VertexOffset));

glEnableClientState(GL_VERTEX_ARRAY);
glEnableClientState(GL_COLOR_ARRAY);

glDrawArrays(GL_TRIANGLES, 0, VertexCount);

glDisableClientState(GL_COLOR_ARRAY);
glDisableClientState(GL_VERTEX_ARRAY);
For this sample, we are using a structure which allows us to interleave vertex data. The structure previously defined is surrounded by the standard pre-processor instructions #pragma pack. In fact, if we get the size of this structure with the sizeof instruction, there are a lot of chances for the returned value to be equal to 12 or maybe 16 octets instead of 11 in this case. The common size of GLfloat is usually 4 bytes and the one of GLubyte is usually 1 byte, therefore a required size of 11 bytes. However, compilers align data in memory because processors are optimized for handling data of the same size as their registers: 4 bytes for 32 bits CPUs and 8 bytes for 64 bits CPUs. That’s a good initiative but when the memory space is expensive, it’s sometime better to forget this optimisation. Actually, in our case, the aligned structure costs 1/12 of extra memory but also 1/12 of extra data transfer to the graphic card. Finally, further problems could occur regarding the management of additional bytes, especially in this case. Where are those additional bytes?
glColorPointer and glVertexPointer functions must always indicate the sources and the types of the data stored by the VBO. To proceed, the specifications suggest a macro called BUFFER_OFFSET:
#define BUFFER_OFFSET(i) ((char*)NULL + (i))
With VBOs, the purpose is not to give the address of the data source, because the source is stored somewhere by the VBO. Rather, an offset indicates where the OpenGL drivers should start reading the data in the VBO memory. In the sample, sizeof(SVertex) is the stride value. This indicates the number of bytes between two vertices for a same attribute. Usually, this value is null in order to simplify the OpenGL API. Null means that the values are adjoining, which means that the VBO contains only one single attribute per vertex and no empty room. Consequently, if we create an array that only contains the spatial 3D coordinates of the vertices, then the following function calls are equivalent:
glVertexPointer(3, GL_FLOAT, 0, 0);
glVertexPointer(3, GL_FLOAT, sizeof(float) * 3, 0);
The BUFFER_OFFSET macro also allows preventing a warning about a conversion of an integer to a pointer.
2.4. Serialized arrays (class CTest4)
For many cases, data used to describe geometric primitives have no reason to be interleaved and it could even become a bad choice. It often happens that we just want to update a part of the data of each vertex. For example, with the case of animated meshes, like a human, texture coordinates never need to be updated but vertex positions and vertex normals have to.
As a result, we just use one single VBO in which we insert several types of data using the glBufferSubData function.
First, we have to reserve some memory room for the full data storage with the glBufferData function. We don’t have to pass the data source in the third parameter anymore; instead we use the 0 value.
Then, we use the glBufferSubData function to fill the array. The second parameter is the VBO data offset. The third one indicates the size of the source data that we want to add and the last one is the data source itself.
glBindBuffer(GL_ARRAY_BUFFER, BufferName);
glBufferData(GL_ARRAY_BUFFER, ColorSize + PositionSize, 0, GL_STREAM_DRAW);

glBufferSubData(GL_ARRAY_BUFFER, 0, ColorSize, ColorData);
glBufferSubData(GL_ARRAY_BUFFER, ColorSize, PositionSize, PositionData);

glColorPointer(3, GL_UNSIGNED_BYTE, 0, 0);
glVertexPointer(2, GL_FLOAT, 0, BUFFER_OFFSET(ColorSize));

glEnableClientState(GL_VERTEX_ARRAY);
glEnableClientState(GL_COLOR_ARRAY);

glDrawArrays(GL_TRIANGLES, 0, VertexCount);

glDisableClientState(GL_COLOR_ARRAY);
glDisableClientState(GL_VERTEX_ARRAY);
Finally, the glBufferSubData function could be used for updating just a part of the whole data, for example in case of partial animated models, or if more than one model is stored in the array, which could be very efficient.
2.5. Vertex mapping (class CTest5)
In some cases, we would like to avoid the use of an intermediate array to store geometry data. This could accelerate the rendering by avoiding a useless data copy. The vertex mapping uses the glMapBuffer function to access by a pointer to the memory room reserved by the VBO.
glBindBuffer(GL_ARRAY_BUFFER, BufferName[POSITION_OBJECT]);
glBufferData(GL_ARRAY_BUFFER, PositionSize, NULL, GL_STREAM_DRAW);
GLvoid* PositionBuffer = glMapBuffer(GL_ARRAY_BUFFER, GL_WRITE_ONLY);
memcpy(PositionBuffer, PositionData, PositionSize);
glUnmapBuffer(GL_ARRAY_BUFFER);
glVertexPointer(2, GL_FLOAT, 0, 0);
One more time, the glBufferData function is just used to reserve the memory room only, the initialisation is done by the programmer thank to the glMapBuffer function. There is three types of acces to VBO data: GL_WRITE_ONLY, GL_READ_ONLY and GL_READ_WRITE. Names are particularly explicit. Modes that allow reading are also very useful because they avoid data duplication for non graphical uses. The function glUnmapBuffer invalids the pointer. It’s better to call glUnmapBuffer as soon as possible because vertex mapping requires CPU and GPU synchronisation.
When many VBOs are used, a good optimisation consists in parallel initialisation because this process decreases the number of CPU/GPU synchronisations. Here is an example:
glBindBuffer(GL_ARRAY_BUFFER, BufferName[COLOR_OBJECT]);
glBufferData(GL_ARRAY_BUFFER, ColorSize, NULL, GL_STREAM_DRAW);
GLvoid* ColorBuffer = glMapBuffer(GL_ARRAY_BUFFER, GL_WRITE_ONLY);

glBindBuffer(GL_ARRAY_BUFFER, BufferName[POSITION_OBJECT]);
glBufferData(GL_ARRAY_BUFFER, PositionSize, NULL, GL_STREAM_DRAW);
GLvoid* PositionBuffer = glMapBuffer(GL_ARRAY_BUFFER, GL_WRITE_ONLY);

memcpy(ColorBuffer, ColorData, ColorSize);
memcpy(PositionBuffer, PositionData, PositionSize);

glBindBuffer(GL_ARRAY_BUFFER, BufferName[COLOR_OBJECT]);
glUnmapBuffer(GL_ARRAY_BUFFER);
glColorPointer(3, GL_UNSIGNED_BYTE, 0, 0);

glBindBuffer(GL_ARRAY_BUFFER, BufferName[POSITION_OBJECT]);
glUnmapBuffer(GL_ARRAY_BUFFER);
glVertexPointer(2, GL_FLOAT, 0, 0);
2.6. Demo with a GLSL-based Animation
This demo uses the deformation shader shown in the following tutorial:
Mesh Deformers - Twister.

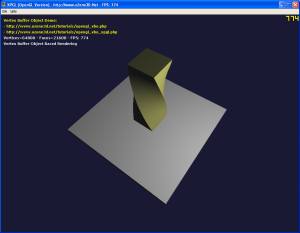
The demo shows the use of VBOs with the GL_STATIC_DRAW mode and the box deformation is performed by a GLSL shader.
Just for comparison, the demo is shipped in two versions: one using VBOs (XPGL_Demo_vbo.exe) and the other using regular Vertex Arrays (XPGL_Demo_va.exe).
The following table shows us the difference of performance between VBO and Vertex Arrays (VA):
| Graphic Card | XPGL_Demo_vbo.exe | XPGL_Demo_va.exe |
| ATI X1950XTX | 760 fps | 145 fps |
The demo uses a small library especially developped for OpenGL experimentation needs: XPGL (eXPerimental Graphics Library)